Premium accounts are $3 a month or $30 a year.

What is PlayIt.GG
PlayIt.GG is a tunneling service that exposes your self hosted game servers to the internet. This lets you share your servers with friends or the public without them needing software to connect into your home network. The only other way to expose your game servers to the internet is by setting up port forwarding on your router assentially poking holes into what seperates your home network from the outside world.
PlayIt.GG alternatives
With the recent changes to playIt.GG you might be more interested in these alternatives.
Oracle Cloud Free Tier with Pangolin
Oracle offers a service, Oracle Cloud Free Tier, that’s free to host on up to a certain point. You can pair that with another service called Pangolin that you can use to essentially make your own Playit.GG service. As long as you only share it with a few friends, you shouldn’t breach the bandwidth limits. You can even give your friends login access (it even integrates with PocketID) to Pangolin to create their own tunnels.
Tailscale
Another alternative that’s my favorite would be Tailscale. Tailscale essentially creates a virtual network between everyone who’s using the Tailscale software and was invited into your network. As long as your game servers are exposed to the Tailscale network, anyone on yours can access them.
I already use Tailscale as a way to access my internal services that aren’t exposed to the internet and have ACLs setup to control what users on the Tailscale network can see.
The downside of Tailscale is that your friends would have to download the Tailscale software to connect to your network which most people are reluctant to do.
How PlayIt.GG works
To setup playit.GG you’ll need to download an agent onto your host PC that connects to your account. Then from your account you’ll create tunnels that’ll route external IPs:Ports to your internal game servers.
First steps - Setup account
The first thing you’ll want to do is setup your account on playit.gg. You’ll need this account to register the agent after it’s installed.
Setting up the agent
Ubuntu Linux
Installing the agent
|
|
If you want PlayIt.GG start when the computers starts you’ll need to run these commands.
|
|
Register your playIt.GG instance with your account. After running the below command you’ll be provided with a link in your terminal. Clicking the link opens a web browser so you can authenticate with your account.
|
|
Setting up your first tunnel
Now that you’ve setup your agent you can start setting up tunnels to expose your game servers to the internet. Unless you’re able to use the pre-defined tunnels this step can be a bit confusing and took me time to wrap my head around.
Pre-defined Tunnels (Minecraft, Hytale, etc)
If you’re setting up a tunnel for one of the games listed below, and are using the default ports, this will be easy to setup.
Steps:
- Click on tunnels in the navigation bar at the top of the page
- Your agent should show as connected
- Click add tunnel
- If you’re using the free version version leave it on Global Anycast
- If you’re paying change this to a data center closer to your server
- For tunnel type select one of the pre-defined games.
- Leave enabled tunnel selected and click add tunnel
Pre-defined tunnels
- Minecraft (Bedrock or Java)
- Hytale
- Valheim
- Terraria
- Project Zomboid
- Starbound
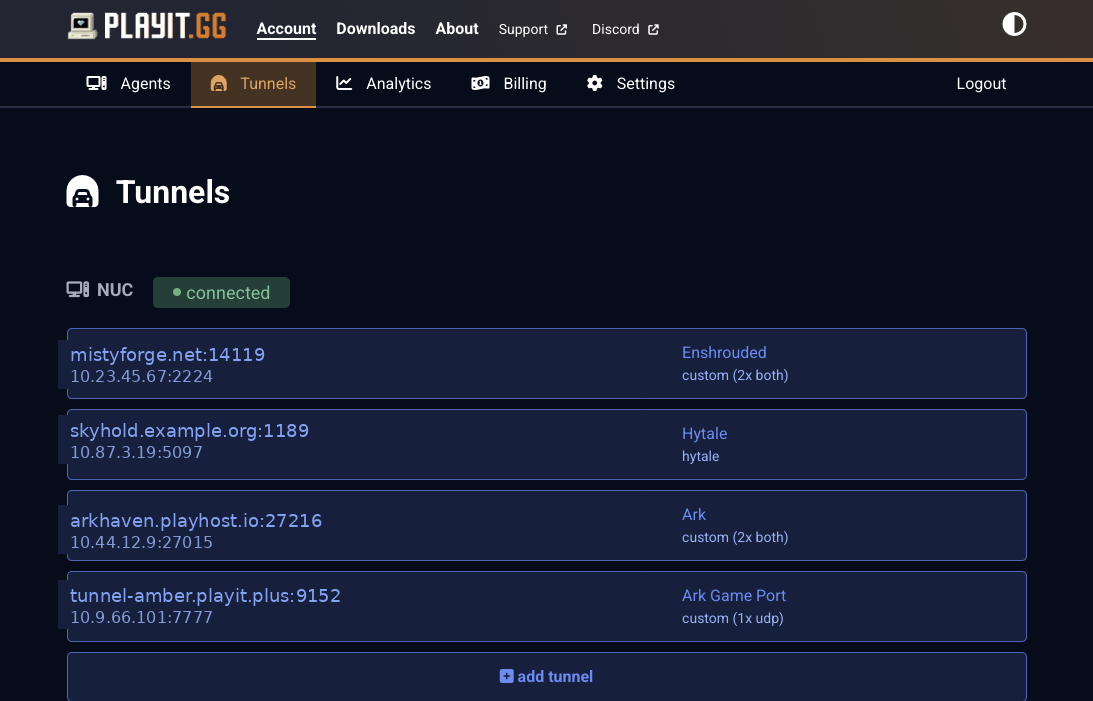
Custom tunnels
If your game wasn’t listed the tunnel setup can be a bit trickier but possible. The reason it can be confusing is that most servers have two ports: a query port for Steam and a game server port that your game connects to. When setting up your tunnel you can specify however many ports you need but you’re only allowed to specify one port number. That statement is probably confusing but I’ll break it down.
Because you’re only able to specify one port number there are two ways to go about the tunnel setup: change your game so that the query port and server port are consecutive numbers or we’ll create a tunnel for each port.
Using one tunnel
The first method for setting up your tunnel is to change your game server so that the query port and server port are consecutive.
You’ll want to make it so that your query port comes first, similar to below.
- Query port = 2224
- Game Server port = 2225
So lets go through the tunnel creation steps:
- On the PlayIt.GG site, click tunnels in the top navigation bar
- Your agent should show as online and in green
- Click add tunnel
- Region: select the one closest to your server
- Tunnel Type: you’ll more than like need TCP+UDP
- Accept the prompt that you agree not to host malware
- You might be prompted to reselect your region and Tunnel type
- Tunnel description: I like to put what game I’m hosting here
- Port count: More than likely 2, unless you need a different amount.
- Local port: The port number of your query, ie 2224
- Click add tunnel
- Congrats your tunnel should be created and listed!
- Click the tunnel to view it’s properties
- Specify your servers local address and click update
- Port number can stay the same unless you change it.
- Congrats on setting up your tunnels! You’re not ready to connect to it.
Using multiple tunnels
The second option for creating custom tunnels is by creating a seperate tunnel for each port. This method works better if you can’t change the port numbers your server runs on or you don’t want to. For this method you’ll probably only need a tunnel for the game server port and a second tunnel for the query port.
Example ports for server. Note they’re not sequential.
- Query port = 2224
- Game Server port = 8888
Setup Steps:
- On the PlayIt.GG site, click tunnels in the top navigation bar
- Your agent should show as online and in green
- Click add tunnel
- Region: select the one closest to your server
- Tunnel Type: you’ll more than like need TCP+UDP
- Accept the prompt that you agree not to host malware
- You might be prompted to reselect your region and Tunnel type
- Tunnel description: I like to put what game I’m hosting here
- For number of ports leave at 1
- Click add tunnel
- Click into the tunnel to modify it’s properties.
- specify the IP of your server
- give the tunnel a name. I like to name it after the port functionality like Hytale Query Port
- Save your change to the tunnel.
- Repeat the above steps for your second tunnel and however many more you need. If the last one was the query port, this is the game port.
- Congrats on setting up your tunnels! You’re not ready to connect to it.
Connecting to your game
After creating your tunnels PlayIt.GG will provide a public {domain name}:port address and a public IP:port address that you can use to connect to your server.
If you’re using the multiple tunnel setups you’ll want to use the public address for your query port tunnel. That’s all Steam needs to connect.
Steps to add the game server to steam:
- If the game is already runny press Shift+F2 to view Steam’s UI
- The click the icon at the bottom for game servers
- If you’re not in game and just have Steam open you can find this option in the view menu -> game servers
- In the game servers window go to the favorites tab.
- Click the + icon to add a new server
- Paste the address from PlayIt.GG and click ok.
- The server should show up as online and available in your favorites list now.
Your friends will probably need to do the same to also connect to the server.
Setting up a custom domain
If you’ve subscribed to PlayIt.GG it lets you use your own domain name instead of the random one they provide. The IP address will still be random but they also offer a static IP at an additional price. For me I’ve had plenty of luck with using the domain name and haven’t needed to pay for the static IP.
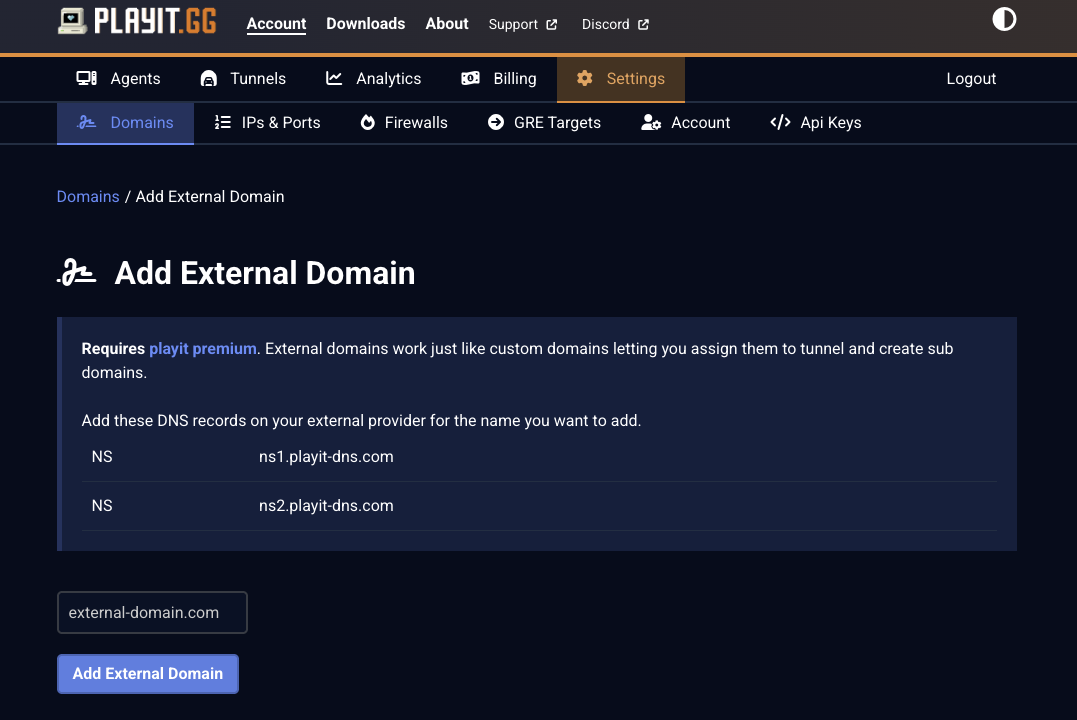
Setup Steps:
- In PlayIt.GG go to Settings -> Domains
- You’ll be provided two DNS records that you’ll need to put into your name server, in my case that’s Cloudflare.
- Applying the DNS records
- login into Cloudflare
- Click your domain name -> DNS -> Records
- Create two new DNS records, one for each nameserver provided by playit.GG. Subdomain is the same for both.
- Type: NS
- Name: chosen subdomain
- Nameserver: Name server provided by playit.GG
- TTL: left on Auto
- Back in Playit.GG click the orange button that says add external domain, type your base domain, ie fiddlesticks.com and apply it.
- It can take some time for your DNS records to update and for your domain to be added. Once it is, you’ll see it listed under settings -> domains and can apply it to your tunnel.
- (Optional) You can also click into the domain name and add multiple subdomains which is useful if you have multiple game servers (ie enshrouded.fiddlesticks.com and palworld.fiddlesticks.com). You’ll just need to make sure to create more NS records in Cloudflare for each of the subdomains.
Now when you view your tunnel settings you’ll see your domain name with a port number (ie mydomain.fiddlesticks.com:24220) that you and your friends can use to connect to the server.